
[iOS] 打包物件 (Archive Object)
有時候我們想要傳遞複雜的物件,比如影像(image)、特性字串(AttributedString)放到Dictionary中以Key/Value儲存,我們就能隨意帶著Dictionary到處趴趴走~這時候可以打包物件 (Archive Object)。

就如同我們所想的那樣,需要封裝(Archive)與解開(Unarchive)。
/**
 Theme: Archive Object
 IDE: Xcode 6
 Language: Objective C
 Date: 104/04/23
 Author: HappyMan
 Blog: https://cg2010studio.wordpress.com/
 */
- (void)viewDidLoad {
    [super viewDidLoad];
#pragma mark - 這裡只是準備複雜特性的字串
    NSMutableAttributedString *string = [[NSMutableAttributedString alloc] initWithString:@"Happy World ^_^"];
    NSRange range = NSMakeRange(0,string.length);
    UIFont *markerFeltWide = [UIFont fontWithName:@"Arial" size:20.0f];
    //字型
    [string addAttribute:NSFontAttributeName value:markerFeltWide range:range];
    //前景顏色
    [string addAttribute:NSForegroundColorAttributeName value:[UIColor greenColor] range:range];
    //背景顏色
    [string addAttribute:NSBackgroundColorAttributeName value:[UIColor lightGrayColor] range:range];
    //底線
    [string addAttribute:NSUnderlineStyleAttributeName value:[NSNumber numberWithInt:1] range:range];
    //字間距
    [string addAttribute:NSKernAttributeName value:[NSNumber numberWithInt:5] range:range];
    //陰影
    NSShadow *shadowDic=[[NSShadow alloc] init];
    [shadowDic setShadowBlurRadius:3.0]; //0 ~ ? 清晰~模糊
    [shadowDic setShadowColor:[UIColor blackColor]];
    [shadowDic setShadowOffset:CGSizeMake(3, 3)];
    [string addAttribute:NSShadowAttributeName value:shadowDic range:range];
    //描邊顏色
    [string addAttribute:NSStrokeColorAttributeName value:[UIColor orangeColor] range:range];
    //描邊線條粗細 正數描邊 負數描邊加填滿
    [string addAttribute:NSStrokeWidthAttributeName value:[NSNumber numberWithInt:-3.0] range:range];

#pragma mark - 封裝
    NSMutableDictionary *happyInfo = [NSMutableDictionary new];

    UIImage *image = [UIImage imageNamed:@"HappyMan.jpg"];
    NSData *imageData1 = [NSData dataWithData:UIImageJPEGRepresentation(image, 1.0f)];
    happyInfo[@"imageKey"] = [NSKeyedArchiver archivedDataWithRootObject: imageData1];
    NSAttributedString *myString = string;
    happyInfo[@"stringKey"] = [NSKeyedArchiver archivedDataWithRootObject: myString];

#pragma mark - 解開
    NSData *archiveImageData = happyInfo[@"imageKey"];
    NSData *imageData = [NSKeyedUnarchiver unarchiveObjectWithData: archiveImageData];
    UIImage *happyImage = [UIImage imageWithData:imageData];
    NSData *stringData = happyInfo[@"stringKey"];
    NSAttributedString *happyString = [NSKeyedUnarchiver unarchiveObjectWithData: stringData];

    [self.happyImageView setImage:happyImage];
    [self.happyTextView setAttributedText:happyString];
}
這裡需要注意的是,影像必須要先轉成Data再來封裝,而一般字串類資料可以直接封裝,這還有道理XD~
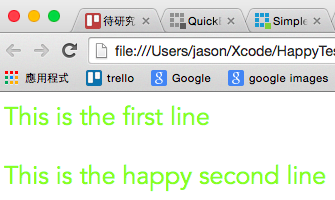
範例中的特性字串含有者些訊息:
Happy World ^_^{
NSBackgroundColor = “UIDeviceWhiteColorSpace 0.666667 1″;
NSColor = “UIDeviceRGBColorSpace 0 1 0 1″;
NSFont = " font-family: \"Arial\"; font-weight: normal; font-style: normal; font-size: 20.00pt";
NSKern = 5;
NSShadow = “NSShadow {3, 3} blur = 3 color = {UIDeviceWhiteColorSpace 0 1}";
NSStrokeColor = “UIDeviceRGBColorSpace 1 0.5 0 1″;
NSStrokeWidth = “-3″;
NSUnderline = 1;
}
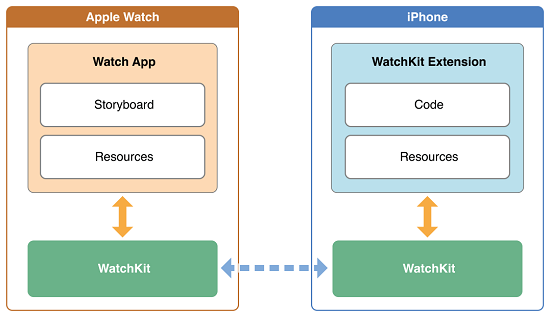
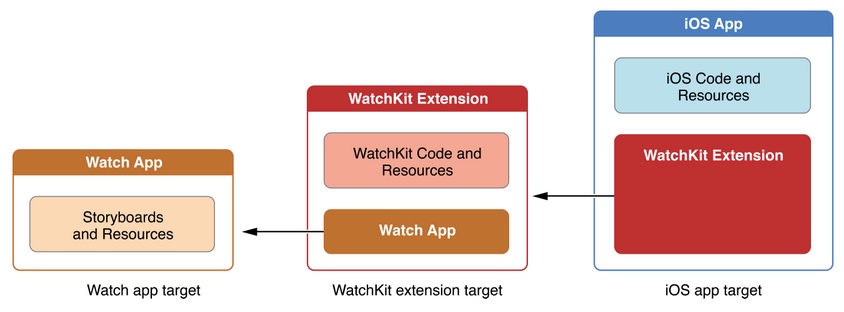
如此就能在有限制情況下傳遞資料囉~這可以用在Watch App和iOS App上的溝通呢!


HappyMan・迴響