
有時候我們會想要從電腦把檔案放進APP中,恰好這個APP可以讀取相片或影片,然後我們就可以重新開啟APP,直接享用我們剛匯入檔案的成果!
在這裡我想展示的是,如何將Core Data資料,由第一個設備複製到第二個設備,如此一來,我就能將資料庫複製多份到無限多個設備上。

首先就是要在專案Info.plist設定Application supports iTunes file sharing (UIFileSharingEnabled)為YES,馬上編譯執行,開啟iTunes軟體,就能看到HappyTest2出現在「檔案共享」清單上喲!表示透過iTunes檔案共享 (File Share through iTunes)功能已開啟~
想要複製Core Data,必須先知道它的位置所在,沒想到它有三個檔案:coredata.splite、coredata.splite-shm、coredata.splite-wal⋯⋯為了不遺漏任何一個相關檔案,我就把它們三個打包成zip檔。若要使用zip檔方式可參考我之前的文章-建立和解除壓縮檔。
我們可以從模擬器來得知此三檔的位置,是在APP母目錄的Library的Private Documents,接著將這三個檔複製到APP母目錄的Documents,即可在iTunes看到檔案出現!真是讓人興奮~
/**
 Theme: File Share through iTunes
 IDE: Xcode 5
 Language: Objective C
 Date: 103/04/26
 Author: HappyMan
 Blog: https://cg2010studio.wordpress.com/
 */
-(BOOL)exportCoreData
{
    NSError *err;
    NSString *coreDataFile1Name = @"coredata.sqlite";
    NSString *coreDataFile2Name = @"coredata.sqlite-shm";
    NSString *coreDataFile3Name = @"coredata.sqlite-wal";
    // 原始檔案路徑
    NSString *libraryDirectory = [NSHomeDirectory() stringByAppendingPathComponent:@"Library"];
    NSString *privateDocumentsDirectory = [libraryDirectory stringByAppendingPathComponent:@"Private Documents"];
    if (![[NSFileManager defaultManager] fileExistsAtPath:privateDocumentsDirectory]) {
        [[NSFileManager defaultManager] createDirectoryAtPath:privateDocumentsDirectory withIntermediateDirectories:YES attributes:nil error:&err];
    }
    NSString *oCoreDataFile1Path = [privateDocumentsDirectory stringByAppendingPathComponent:coreDataFile1Name];
    NSString *oCoreDataFile2Path = [privateDocumentsDirectory stringByAppendingPathComponent:coreDataFile2Name];
    NSString *oCoreDataFile3Path = [privateDocumentsDirectory stringByAppendingPathComponent:coreDataFile3Name];
    if (![[NSFileManager defaultManager] fileExistsAtPath:oCoreDataFile1Path]) {
        DxLog(@"oCoreDataFile1Path not exists");
    }
    if (![[NSFileManager defaultManager] fileExistsAtPath:oCoreDataFile2Path]) {
        DxLog(@"oCoreDataFile2Path not exists");
    }
    if (![[NSFileManager defaultManager] fileExistsAtPath:oCoreDataFile3Path]) {
        DxLog(@"oCoreDataFile3Path not exists");
    }
    // 壓縮檔案

    // 想要創造的ZIP檔的路徑
    NSString *documentsDirectory = [NSHomeDirectory() stringByAppendingPathComponent:@"Documents"];
    NSString *zipPath = [documentsDirectory stringByAppendingPathComponent:[NSString stringWithFormat:@"zipFile.zip"]];
    // 先移除
    [[NSFileManager defaultManager] removeItemAtPath:zipPath error:&err];

    ZipArchive *zip = [[ZipArchive alloc] init];
    [zip CreateZipFile2:zipPath Password:@""];
    // 想要加入的檔案的路徑
    // newname參數為在ZIP檔中的新名稱
    if (![zip addFileToZip:oCoreDataFile1Path newname:coreDataFile1Name])
    {
        // 加入檔案失敗的處理~
    }
    if (![zip addFileToZip:oCoreDataFile2Path newname:coreDataFile2Name])
    {
        // 加入檔案失敗的處理~
    }
    if (![zip addFileToZip:oCoreDataFile3Path newname:coreDataFile3Name])
    {
        // 加入檔案失敗的處理~
    }
    BOOL success = [zip CloseZipFile2];
    return success;
}

-(BOOL)importCoreData
{
    NSError *err;
    NSString *coreDataFile1Name = @"coredata.sqlite";
    NSString *coreDataFile2Name = @"coredata.sqlite-shm";
    NSString *coreDataFile3Name = @"coredata.sqlite-wal";
    NSString *documentsDirectory = [NSHomeDirectory() stringByAppendingPathComponent:@"Documents"];
    // 想要解除的ZIP檔的路徑
    NSString *zipPath = [documentsDirectory stringByAppendingPathComponent:[NSString stringWithFormat:@"zipFile.zip"]];
    ZipArchive *zip = [[ZipArchive alloc] init];
    if ([zip UnzipOpenFile:zipPath Password:@""])
    {
        if (![zip UnzipFileTo:documentsDirectory overWrite:YES]) {
            // 解壓縮失敗的處理~
        }
    }

    BOOL success = [zip UnzipCloseFile];

    // 目標檔案路徑
    NSString *tCoreDataFile1Path = [documentsDirectory stringByAppendingPathComponent:coreDataFile1Name];
    NSString *tCoreDataFile2Path = [documentsDirectory stringByAppendingPathComponent:coreDataFile2Name];
    NSString *tCoreDataFile3Path = [documentsDirectory stringByAppendingPathComponent:coreDataFile3Name];
    if (![[NSFileManager defaultManager] fileExistsAtPath:tCoreDataFile1Path]) {
        DxLog(@"tCoreDataFile1Path not exists");
    }
    if (![[NSFileManager defaultManager] fileExistsAtPath:tCoreDataFile2Path]) {
        DxLog(@"tCoreDataFile2Path not exists");
    }
    if (![[NSFileManager defaultManager] fileExistsAtPath:tCoreDataFile3Path]) {
        DxLog(@"tCoreDataFile3Path not exists");
    }

    [self listFileAtPath:documentsDirectory];

    // 原始檔案路徑
    NSString *libraryDirectory = [NSHomeDirectory() stringByAppendingPathComponent:@"Library"];
    NSString *privateDocumentsDirectory = [libraryDirectory stringByAppendingPathComponent:@"Private Documents"];
    if (![[NSFileManager defaultManager] fileExistsAtPath:privateDocumentsDirectory]) {
        [[NSFileManager defaultManager] createDirectoryAtPath:privateDocumentsDirectory withIntermediateDirectories:YES attributes:nil error:&err];
    }
    NSString *oCoreDataFile1Path = [privateDocumentsDirectory stringByAppendingPathComponent:coreDataFile1Name];
    NSString *oCoreDataFile2Path = [privateDocumentsDirectory stringByAppendingPathComponent:coreDataFile2Name];
    NSString *oCoreDataFile3Path = [privateDocumentsDirectory stringByAppendingPathComponent:coreDataFile3Name];
    // 先移除
    [[NSFileManager defaultManager] removeItemAtPath:oCoreDataFile1Path error:&err];
    [[NSFileManager defaultManager] removeItemAtPath:oCoreDataFile2Path error:&err];
    [[NSFileManager defaultManager] removeItemAtPath:oCoreDataFile3Path error:&err];
    // 再複製
    [[NSFileManager defaultManager] copyItemAtPath:tCoreDataFile1Path toPath:oCoreDataFile1Path error:&err];
    [[NSFileManager defaultManager] copyItemAtPath:tCoreDataFile2Path toPath:oCoreDataFile2Path error:&err];
    [[NSFileManager defaultManager] copyItemAtPath:tCoreDataFile3Path toPath:oCoreDataFile3Path error:&err];

    return success;
}

-(NSArray *)listFileAtPath:(NSString *)path
{
    //-----> LIST ALL FILES <-----//
    NSLog(@"LISTING ALL FILES FOUND");

    int count;

    NSArray *directoryContent = [[NSFileManager defaultManager] contentsOfDirectoryAtPath:path error:NULL];
    for (count = 0; count < (int)[directoryContent count]; count++)
    {
        NSLog(@"File %d: %@", (count + 1), [directoryContent objectAtIndex:count]);
    }
    return directoryContent;
}
連結設備到電腦,開啟iTunes該設備的App欄位,接著實際執行一遍就知道有多神奇!可以直接將電腦上的資料拖曳進該APP中,也能將該APP中的檔案拉出到電腦上喔!
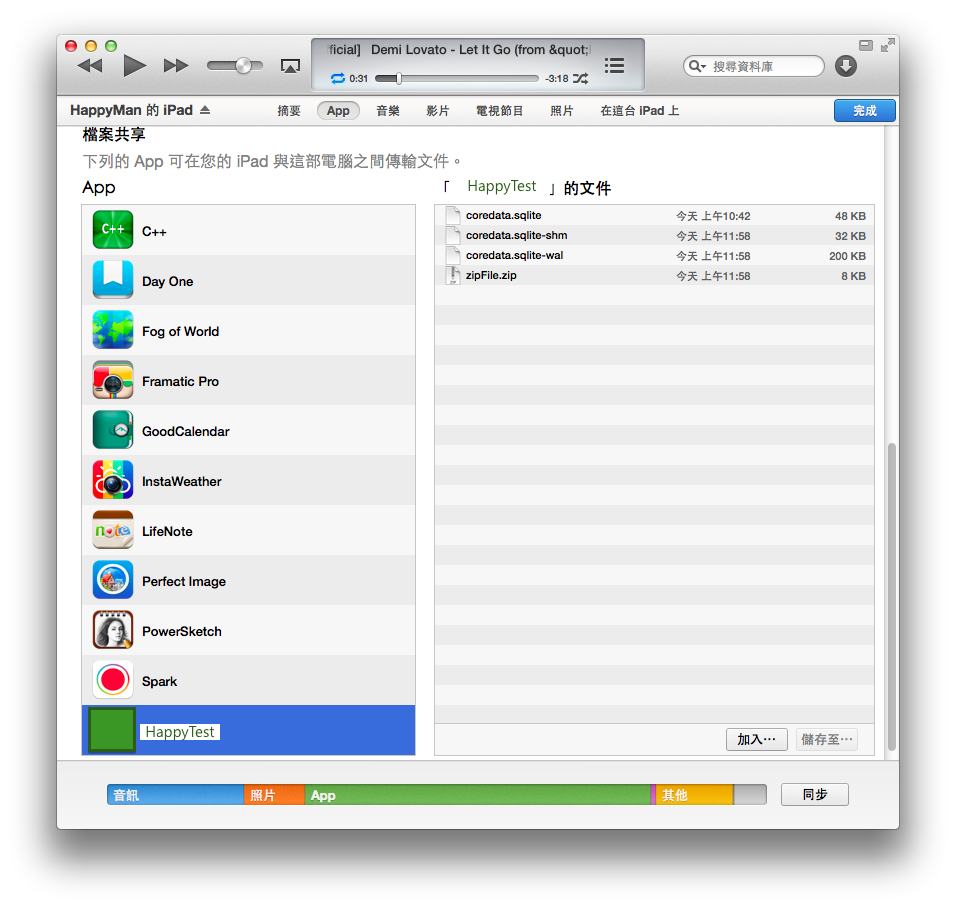
我的程式碼首先要執行exportCoreData,會先將位於私密資料夾三個檔案打包,iTunes就出現zipFile.zip(只有這一個檔);接著執行importCoreData,會解壓縮zipFile.zip,iTunes就出現三個Core Data檔(共有四個檔),同時複製這三個檔到私密資料夾。
最後重新編譯執行,就能看到Core Data成功匯入另一台設備!若要用程式自殺,可以用exit(0)這個指令喔~
參考:iOS如何设置app支持文件共享、讓iOS App通過iTunes進行文件交換、通過iTunes共享文件到Document目錄。

Comments on: "[iOS] 透過iTunes檔案共享 (File Share through iTunes)" (1)
[…] 在此我要將student.sqlite抽出來,可以參考我先前的文章:透過iTunes檔案共享。抽出來之後我再使用SQLite Database Browser來查看! […]
讚讚