
雖然可以客製化TableViewCell (Customize TableViewCell)來完成,但是客製化CollectionViewCell (Customize CollectionViewCell)能讓我們更簡單地實作,而且landscape和portrait這兩種界面的轉換它都幫我們處理好,接著只要撰寫幾行程式碼,就可以做出像內建相簿那樣的格子瀑布流喔!
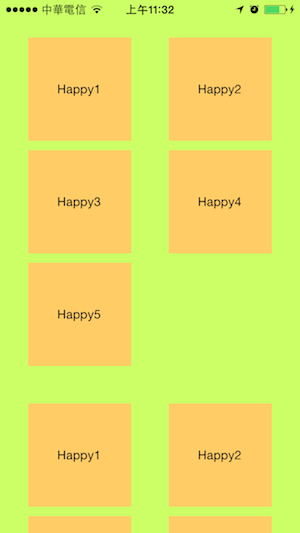
portrait的樣子。
一直看到其它教學都是使用storyboard來實作,但是我就是想用彈性高的xib來刻版,總算讓我找到方法,之前就是搞不懂而放棄使用><;原來只是改變所使用的API,而collection view cell和table view cell客製化有些為差異呢!
在專案中新增檔案,有兩個步驟:
- iOS中Cocoa Touch的Objective-C class
- iOS中User Interface的Empty
兩者命同樣的名稱,結束後產生.h、.m、.xib三個檔案。如HTCollectionCell。

/**
 Theme: Customize CollectionViewCell
 IDE: Xcode 5
 Language: Objective C
 Date: 103/06/06
 Author: HappyMan
 Blog: https://cg2010studio.wordpress.com/
 */

//HTCollectionViewController.h
#import <UIKit/UIKit.h>

@interface HTCollectionViewController : UIViewController <UICollectionViewDataSource, UICollectionViewDelegateFlowLayout>
{
    IBOutlet UICollectionView *displayCollectionView;
    NSArray *itemArray;
}
@end

//HTCollectionViewController.m
#import "HTCollectionViewController.h"
#import "HTCollectionCell.h"

@interface HTCollectionViewController ()

@end

@implementation HTCollectionViewController

- (id)initWithNibName:(NSString *)nibNameOrNil bundle:(NSBundle *)nibBundleOrNil
{
    self = [super initWithNibName:nibNameOrNil bundle:nibBundleOrNil];
    if (self) {
        itemArray = @[@"Happy1", @"Happy2", @"Happy3", @"Happy4", @"Happy5"];
    }
    return self;
}

- (void)viewDidLoad
{
    [super viewDidLoad];
//    [displayCollectionView registerClass:[UICollectionViewCell class] forCellWithReuseIdentifier:@"DefaultCell"];
    [displayCollectionView registerNib:[UINib nibWithNibName:@"HTCollectionCell" bundle:nil] forCellWithReuseIdentifier:@"HappyCell"];
}

#pragma mark - UICollectionViewDataSource
-(NSInteger)collectionView:(UICollectionView *)collectionView numberOfItemsInSection:(NSInteger)section
{
    return [itemArray count];
}

-(NSInteger)numberOfSectionsInCollectionView:(UICollectionView *)collectionView
{
    return 3;
}

-(UICollectionViewCell *)collectionView:(UICollectionView *)collectionView cellForItemAtIndexPath:(NSIndexPath *)indexPath
{
//    UICollectionViewCell *cell = [collectionView dequeueReusableCellWithReuseIdentifier:@"DefaultCell" forIndexPath:indexPath];
    HTCollectionCell *cell = [collectionView dequeueReusableCellWithReuseIdentifier:@"HappyCell" forIndexPath:indexPath];
    [cell.button setTitle:itemArray[indexPath.row] forState:UIControlStateNormal];
//    cell.backgroundColor = [UIColor whiteColor];
    return cell;
}

#pragma mark - UICollectionViewDelegate
- (void)collectionView:(UICollectionView *)collectionView didSelectItemAtIndexPath:(NSIndexPath *)indexPath
{
    // TODO: Select Item
    NSLog(@"Select indexPath.row: %i", indexPath.row);
}
- (void)collectionView:(UICollectionView *)collectionView didDeselectItemAtIndexPath:(NSIndexPath *)indexPath {
    // TODO: Deselect item
    NSLog(@"Deselect indexPath.row: %i", indexPath.row);
}

#pragma mark – UICollectionViewDelegateFlowLayout
- (CGSize)collectionView:(UICollectionView *)collectionView layout:(UICollectionViewLayout*)collectionViewLayout sizeForItemAtIndexPath:(NSIndexPath *)indexPath {
    CGSize size = CGSizeMake(110, 110);
    return size;
}

- (UIEdgeInsets)collectionView:
(UICollectionView *)collectionView layout:(UICollectionViewLayout*)collectionViewLayout insetForSectionAtIndex:(NSInteger)section {
    return UIEdgeInsetsMake(20, 30, 20, 30);
}
@end

//HTCollectionCell.h
#import <UIKit/UIKit.h>

@interface HTCollectionCell : UICollectionViewCell
@property (nonatomic, retain) IBOutlet UIButton *button;

@end
//HTCollectionCell.m
//不用寫什麼~
註解的地方表示不用客製化collection view cell的做法,反註解可以測試看看。
HTCollectionViewController.xib:
必須拉UICollectionView的元件喔!並拉好Outlets的dataSource和delegate。
HTcollectionCell.xib:
我有拉個UIButton~並拉好Outlets。
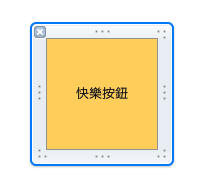
cell記得要設定兩個地方:


編譯執行在實機上的結果:

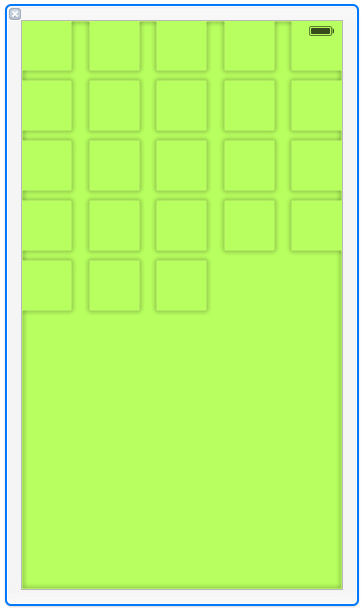
landscape的樣子,會自動排列呢!
從此以後,不需用table view cell寫許多處理的格子特性的程式碼!
2020/07/31更新
若想要加入像TableView有的Header和Footer,則要這麼寫~
    [collectionView registerClass:[UICollectionReusableView class] forSupplementaryViewOfKind:UICollectionElementKindSectionFooter withReuseIdentifier:@"Footer"];


-(UICollectionReusableView *)collectionView:(UICollectionView *)collectionView viewForSupplementaryElementOfKind:(nonnull NSString *)kind atIndexPath:(nonnull NSIndexPath *)indexPath
{
     UICollectionReusableView *reusableview = nil;

     if (kind == UICollectionElementKindSectionFooter) {
         UICollectionReusableView *footerView = [collectionView dequeueReusableSupplementaryViewOfKind:UICollectionElementKindSectionFooter withReuseIdentifier:@"Footer" forIndexPath:indexPath];

         for (UIView *view in footerView.subviews) {
             [view removeFromSuperview];
         }

         UIImageView *logoImageView = [[UIImageView alloc] initWithImage:[UIImage imageNamed:@"logo_tt_gray"]];
         [footerView addSubview:logoImageView];
         logoImageView.center = CGPointMake(footerView.frame.size.width/2, footerView.frame.size.height/2);
         reusableview = footerView;
    }
    return reusableview;
}

- (CGSize)collectionView:(UICollectionView *)collectionView layout:(UICollectionViewLayout*)collectionViewLayout referenceSizeForFooterInSection:(NSInteger)section
{
    // 只有height有作用⋯⋯
    return CGSizeMake(0, 80);
}
參考:UICollectionVIew without using the storyboard?、GitHub –TestCollectionViewWithXIB、Beginning UICollectionView In iOS 6: Part 1/2、Creating Custom Collection View Cells in iOS7。

隨意留個言吧:)~