
回顧之前使用OpenCV所做的人臉偵測 (Face Detection),當時只是覺得這門技術好厲害。如今我感興趣的平台是行動裝置,趁此拿來把玩一下,說不一定可以想出有趣的應用!
 拿可愛學妹的相片來作實驗,效果好又賞心悅目:D~
在iOS中,不必使用OpenCV,直接使用內建方法實作。
首先在專案匯入Framework:
- QuartzCore.framework
- CoreImage .framwork
接著在檔案中引入.h檔:
- #import <CoreImage/CoreImage.h>
- #import <QuartzCore/QuartzCore.h>
最後在.m中實作,所有的步驟都在程式碼中說明,同時偵測臉部、雙眼、嘴巴:
/**
 Theme: Face Detection
 IDE: Xcode 5
 Language: Objective C
 Date: 102/12/12
 Author: HappyMan
 Blog: https://cg2010studio.wordpress.com/
 */

- (void)viewDidLoad
{
    [super viewDidLoad];
	[self faceDetector];
}

-(void)markFaces:(UIImageView *)facePicture
{
    // draw a CI image with the previously loaded face detection picture
    CIImage* image = [CIImage imageWithCGImage:facePicture.image.CGImage];

    // create a face detector - since speed is not an issue we'll use a high accuracy
    // detector
    CIDetector* detector = [CIDetector detectorOfType:CIDetectorTypeFace
                                              context:nil options:[NSDictionary dictionaryWithObject:CIDetectorAccuracyHigh forKey:CIDetectorAccuracy]];

    // create an array containing all the detected faces from the detector
    NSArray* features = [detector featuresInImage:image];

    // we'll iterate through every detected face.  CIFaceFeature provides us
    // with the width for the entire face, and the coordinates of each eye
    // and the mouth if detected.  Also provided are BOOL's for the eye's and
    // mouth so we can check if they already exist.
    for(CIFaceFeature* faceFeature in features)
    {
        // get the width of the face
        CGFloat faceWidth = faceFeature.bounds.size.width;

        // create a UIView using the bounds of the face
        UIView* faceView = [[UIView alloc] initWithFrame:faceFeature.bounds];

        // add a border around the newly created UIView
        faceView.layer.borderWidth = 3;
        faceView.layer.borderColor = [[UIColor redColor] CGColor];

        // add the new view to create a box around the face
        [self.imageView addSubview:faceView];

        if(faceFeature.hasLeftEyePosition)
        {
            // create a UIView with a size based on the width of the face
            UIView* leftEyeView = [[UIView alloc] initWithFrame:CGRectMake(faceFeature.leftEyePosition.x-faceWidth*0.15, faceFeature.leftEyePosition.y-faceWidth*0.15, faceWidth*0.3, faceWidth*0.3)];
            // change the background color of the eye view
            [leftEyeView setBackgroundColor:[[UIColor blueColor] colorWithAlphaComponent:0.3]];
            // set the position of the leftEyeView based on the face
            [leftEyeView setCenter:faceFeature.leftEyePosition];
            // round the corners
            leftEyeView.layer.cornerRadius = faceWidth*0.15;
            // add the view to the window
            [self.imageView addSubview:leftEyeView];
        }

        if(faceFeature.hasRightEyePosition)
        {
            // create a UIView with a size based on the width of the face
            UIView* leftEye = [[UIView alloc] initWithFrame:CGRectMake(faceFeature.rightEyePosition.x-faceWidth*0.15, faceFeature.rightEyePosition.y-faceWidth*0.15, faceWidth*0.3, faceWidth*0.3)];
            // change the background color of the eye view
            [leftEye setBackgroundColor:[[UIColor blueColor] colorWithAlphaComponent:0.3]];
            // set the position of the rightEyeView based on the face
            [leftEye setCenter:faceFeature.rightEyePosition];
            // round the corners
            leftEye.layer.cornerRadius = faceWidth*0.15;
            // add the new view to the window
            [self.imageView addSubview:leftEye];
        }

        if(faceFeature.hasMouthPosition)
        {
            // create a UIView with a size based on the width of the face
            UIView* mouth = [[UIView alloc] initWithFrame:CGRectMake(faceFeature.mouthPosition.x-faceWidth*0.2, faceFeature.mouthPosition.y-faceWidth*0.2, faceWidth*0.4, faceWidth*0.4)];
            // change the background color for the mouth to green
            [mouth setBackgroundColor:[[UIColor greenColor] colorWithAlphaComponent:0.3]];
            // set the position of the mouthView based on the face
            [mouth setCenter:faceFeature.mouthPosition];
            // round the corners
            mouth.layer.cornerRadius = faceWidth*0.2;
            // add the new view to the window
            [self.imageView addSubview:mouth];
        }
    }
}

-(void)faceDetector
{
    // Load the picture for face detection
    UIImageView* image = [[UIImageView alloc] initWithImage:[UIImage imageNamed:@"HappyMan.jpg"]];

    // Draw the face detection image
    [self.imageView addSubview:image];

    // Execute the method used to markFaces in background
    [self performSelectorInBackground:@selector(markFaces:) withObject:image];

    // flip image on y-axis to match coordinate system used by core image
    [image setTransform:CGAffineTransformMakeScale(1, -1)];

    // flip the entire window to make everything right side up
    [self.imageView setTransform:CGAffineTransformMakeScale(1, -1)];
//    self.imageView.transform = CGAffineTransformMakeRotation(M_PI_2 * 2);
}
偵測到人臉,以紅色粗框標示;偵測到人眼,以藍色半透明圓形標示;偵測到嘴巴,以綠色半透明圓形標示。
執行結果:
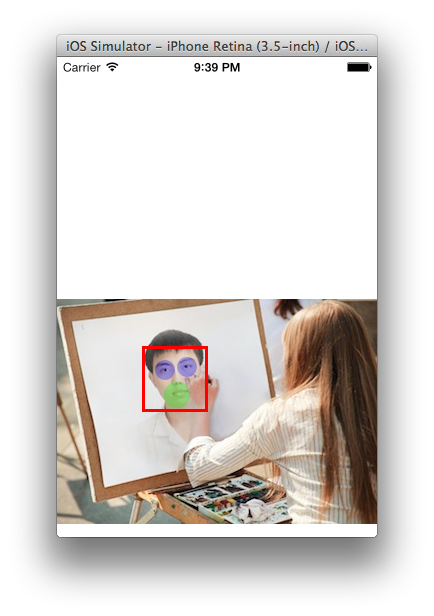
單人如我
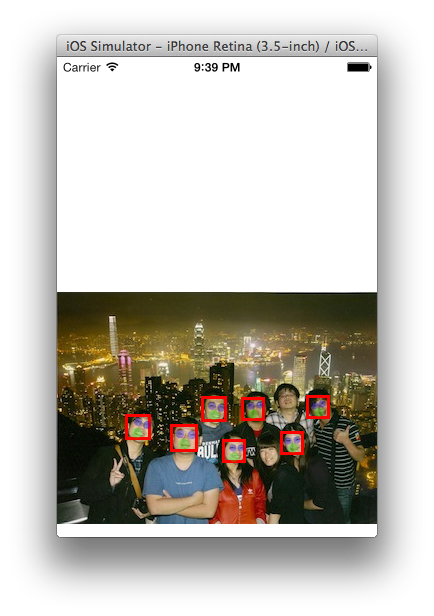
多人夥伴們員工旅遊在香港太平山夜景合照
參考:Tutorial: Easy Face Detection With Core Image In iOS 5 (Example Source Code Provided)。

Comments on: "[iOS] 人臉偵測 (Face Detection)" (2)
[…] 早在2013年,我就把玩過iOS的人臉偵測 (Face Detection),當時覺得非常酷!因為已經能在手機上玩人臉偵測,回想2011年,我還在研究電腦上OpenCV,那時可是我研究所樂趣之一呢~ […]
讚讚
[…] 人臉偵測 iOS […]
讚讚